Monday, December 30, 2013

Fermenting Beets


This is my second batch of fermented beets and carrots with cloves and mustard seed. The first experimental batch turned out really well. The beets were firm and crunchy but soft enough to eat easily. And they were sweet (along with the tangy sour from the fermentation)! I'm really looking forward to the next batch. The first batch was so good that I've been sipping the brine! (It's supposed to be good for your liver - see kvass.)

Ingredients
Enough beets and carrots to fill a 32 ounce jar (about 3 medium beets and 3 carrots)
2 teaspoons of whole cloves
1 teaspoon of whole mustard seed (yellow or brown)
2 cups brine (2 cups water, 4 teaspoons sea salt)
(You could also add some cinnamon stick. I'll try that on the next batch.)
1 cabbage leaf

Directions
1.  Add the cloves and mustard seed to the jar.
2.  Cut up the beets and carrots (about 1/8" to 1/4" thick). You can leave the skins on or peel them off. It's up to you. I left them on for this batch. I peeled the first batch I made.
3.  Add the beets and carrots to the jar. Pack the jar tight to reduce empty space.
4.  Add the brine all the way to the top. Try to agitate the jar to get all the air bubbles out.
5.  Fold the cabbage leaf and stuff it into the top of the jar to keep all the beets and carrots under the surface of the brine.
6.  Put the lid on the jar (not too tight). Put the jar in a casserole dish and put somewhere out of the way (like the top of your fridge). Give it about a week (though it could take as little as four days or as long as two weeks depending on the temperature in your home). Taste a beet or carrot every day to check for "doneness" (that's up to you - I like my ferments nice and sour).
7.  When you're happy with your fermentation, toss the cabbage leaf in the compost and put the jar in the fridge.
Enjoy!

Saturday, August 31, 2013

Watermelon Juice Margarita

I recently juiced a watermelon. I got three quarts of juice (it's such a beautiful color!). My four-year-old would have liked to drink an entire quart. My spouse made popsicles with one quart (the juice was for her), but she said I could use some of it how ever I wished.

A friend had told me about how he likes to make frozen watermelon margaritas a few years ago. I've tried making them a couple of times but have never really been impressed. I thought I might give it another try now that I had so much watermelon juice. But I thought I would leave out the frozen part.

I ran across this margarita recipe on The Kitchn blog, and I really enjoy it! I'll often leave out the cold water that the recipe calls for and just add a little more ice and shake the drink a little longer for more melt (and a colder drink).

The first watermelon juice margarita I made: 2 oz tequila, 2 oz watermelon juice, .75 oz lime juice, .5 oz agave nectar, ice. This was a good drink. Sweet like many margaritas, but with a subtle watermelon flavor.

Watermelon Juice Margarita (#2)
2 oz tequila
4 oz watermelon juice
1 oz lime juice
ice

This was a very light margarita experience. It wasn't really sweet (I like that there wasn't any added sweetener), the watermelon flavor was more forward, the lime and tequila were both very evident and balanced, too. I would drink this again.

UPDATE: I've tried adding between a half-tablespoon and a tablespoon of agave nectar to the #2 recipe and really enjoyed the results. And I shake the margarita to mix it as opposed to stirring it.

UPDATE 2017-05-28: Here are some additional notes on the #2 recipe. I put the watermelon in the blender now. And I use 2 tsps of agave nectar as noted in the above update. The blended watermelon is not a sweet as the watermelon juice (thus the agave nectar), but it is still very good.

Tuesday, August 27, 2013

My Grown Up Mojito

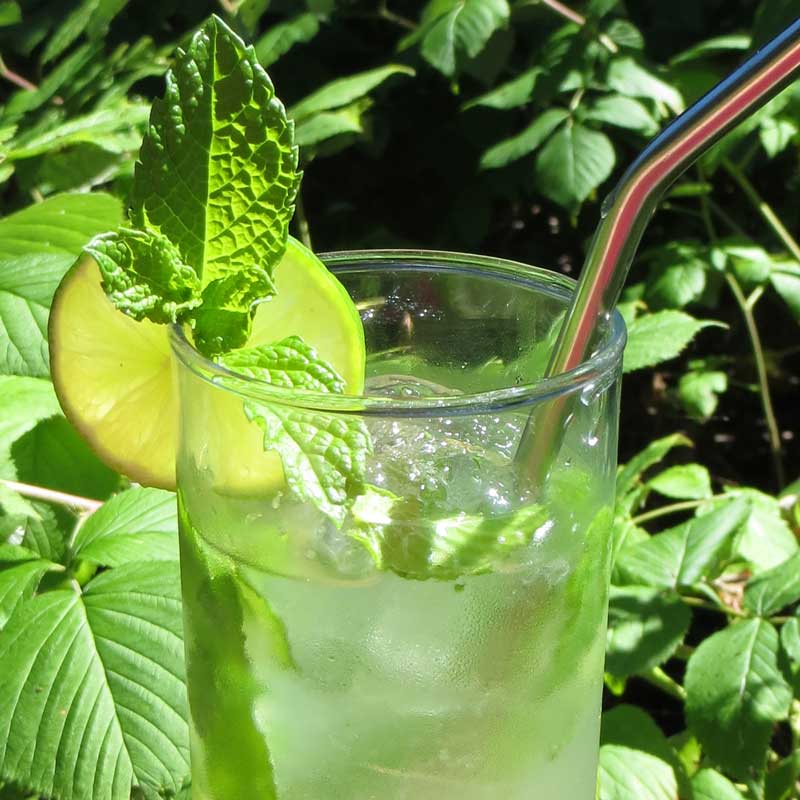
I began making mojitos as my go to summer drink a few years ago. I worked on my proportions over the course of three summers and was very pleased with what I'd arrived at.

Mojito Spritzer
1/3 cup white rum
1 cup carbonated water (I use San Pellegrino)
8-12 spearmint leaves
1 Tbsp fresh lime juice
2 Tbsps syrup (1 part white sugar, 1 part water)
3-4 ice cubes
Pour the rum in a pint glass. Put in the mint leaves. Gently muddle the leaves. Add the carbonated water, lime juice, syrup and ice. Gently stir the drink.

Muddling Note: Use a nice muddler. Mine is made of cherry wood and has a long handle. I oil it to seal it regularly. Be gentle with the mint. Press and maybe make a small rocking motion... or maybe a small twist. You're not trying to blend the mint. You're trying to release the oils. If you don't have a muddler, you can try using the handle of a wooden spoon.

Turns out that this was a gateway recipe. It was sweet, light, and very drinkable. But to be honest, it was like a soda and while it was ultimately a good thirst quencher, it lacked enough depth to keep me from wandering. Or perhaps my palate matured (or at least changed).

About a year ago, I ran across this recipe for the style of mojito that Ernst Hemingway drank. While I liked this recipe, I noticed a couple of things that I didn't care for as much. I didn't like the way that the brown sugar muted the spearmint. I've grown used to the minty brightness of my first recipe, and I've experimented with brown sugar (and even honey) before and dismissed it as too much extra competing flavor. I also didn't like the dominance the Champagne had in the drink. It overpowered what I've come to consider the primary experience of a mojito: bright spearmint, background lime, and a rum foundation. That being said, I still liked the character and complexity that the Champagne contributed.

I had recently read a recipe for a Champagne Mint Julep that used a sparkling moscato wine and it struck me that I might be able to substitute it for the Champagne in the mojito and maybe even leave out the sugar entirely! After some experimentation, I realized that there is a lot of variation in sparkling moscato wines. Many of them are VERY sweet and have a very heavy grape flavor. This is to be expected since the muscat grape is a table grape and what you're getting is grape juice wine.

I ran into a good mojito candidate when I tried Barefoot Bubbly Moscato Spumante wine. It's not overly sweet and doesn't have a heavy grape flavor. This is now my favorite way to drink mojitos!


My Champagne Mojito
8+ fresh spearmint leaves
1 Tbsp lime juice
1.5 oz white rum
3 oz moscato sparkling wine (Barefoot Bubbly Moscato Spumante)
3-4 ice cubes

I'm going to continue to play with the proportions, but I'm pretty happy with it right now. It's a really simple recipe, and it has all the qualities that I look for in a mojito. The biggest change is that's it's not very sweet. I've made it for some friends and one said that it struck him as a "grown up" drink. And they've all really enjoyed the recipe!

I've tried Barefoot's sparkling Red Moscato and found it to work very well with this recipe as well.

Sunday, August 25, 2013

GoodLife Descender IPA


I ran into GoodLife's Descender IPA on tap at Ellensburg Pasta Company a few weeks ago and really enjoyed it. It's just about as good in the can. Compared to many NW IPA's, it's not overly hoppy. The flavor is nicely balanced and has distinct tones of citrus. I'll definitely be drinking this beer again!

Sunday, August 11, 2013

My First Kimchi

I've been curious to try my hand at kimchi. Strangely, though, I've never tasted it before. I've just never had the drive to go to a Korean restaurant or to buy a jar of kimchi at the store. After reading a few recipes, I settled on one I found on the Kitchn blog here. I used granulated kelp instead of fish sauce so mine is vegan. I also used three tablespoons of the Korean red pepper flakes.

Here's what the batch looked like on day one. BTW, I highly recommend wearing gloves when mixing up the ingredients. 

The kimchi was VERY fragrant and smelled up the whole kitchen. I tried putting the jars in a ziplock freezer bag, but the smell still got through. It was kind of fascinating to see the bag inflate a little and to see condensation on the inside every morning.

This is what the kimchi looked like after seven days. It tasted pretty good. The recipe recommends letting it sit in the fridge for another week for best results. I put the jars in three ziplock freezer bags (and filled one of them with a bunch of baking soda), but the smell still got through and stunk up the fridge (this is not unlike having dill in your fridge, though one good bag will usually protect the fridge).

Now the kimchi is sitting in a cooler on the front porch. I swap out ice packs two times a day. This is day eleven and the kimchi tastes even better. The flavors are melding more and there is still a nice crunch.

UPDATE: 8/22/2013
Some friends who have made and eaten way more kimchi than I have tasted my kimchi on day eighteen. They liked the crunch and general flavor but said it could use more salt. I had been wondering about the salt level and feared I had used too much water when soaking the cabbage (and had diluted the saltiness). I added about a teaspoon of salt to the batch and mixed it thoroughly. The flavor improved significantly!

FAVORITE FLAVOR PAIRINGS:
Hummus and kimchi
Using kimchi instead of salsa on tacos

Tuesday, July 16, 2013

Beans and Lentils

How I cook/prepare beans and lentils...

Sprouting/Germination
1. Rinse the beans, then soak them in filtered water for about 8-12 hours (depending on the size on the bean).
2. Drain the water, then place in a sprouting container (if they're not in one already), rinse with fresh filtered water every 6-12 hours depending on humidity. I place the sprouting container on its side to increase aeration.
3. Repeat step 2 until the roots/tails are at your desired length (could be 1 mm, could be 1 inch... I usually sprout for 2 days).

You could eat your beans/spouts now if you want (raw or cooked).

Sprouted Black Lentils

Fermenting/Brining
4. Take the sprouts and soak in salt water. I use 2 teaspoons salt per 1 cup of filtered water. Make sure the water is an inch or more above the beans. You can add a starter like a cabbage leaf, but I find it unnecessary. It's good to have a screw-on lid on your fermenting container as the bubbles will float the beans. Shake or stir the beans every 8 hours or so to resubmerge them. Or use a weight to keep them under water (a brine filled closed jar or plastic bag can work).
5. Ferment/brine as long as you want. I've gone as long as ten days before eating them raw or cooking them.

Tip: Place your fermentation container in a glass casserole dish as the brine will often overflow the fermenting container (the lid of which should only be screwed on loosely).

Tip: Don't use metal containers or lids as they may rust (stainless steel may be okay, but I haven't tried it). I use plastic (HDPE and PP) and glass containers that are left over from other foods (mayonnaise jars are good for small batches). I use big 96 oz protein powder tubs for my bean fermenting (they easily hold three cups of dry beans as they expand).

Sprouted Black Lentils Fermenting

Cooking
6. I like to use a pressure cooker. I gently rinse the fermented/sprouted beans with filtered water. It's important to get most of the salt water off as it will make the cooked beans too salty. All pressure cookers are different so times may vary. I cook bigger beans for 2-3 minutes at high pressure and then let the pressure come down naturally. I cook lentils for 1 minute and then let the pressure come down naturally. I'll sometimes use stock instead of water. And I always add a tablespoon or so of olive oil to reduce the foam/gas in the pressure cooker.

All three of these preparation techniques are supposed to reduce phytic acid, lectins, and gas in the beans/lentils. And the resulting beans taste great! The salt level is just right. So is the texture.